


In this guide, we’ll focus on shading heels in Pocket Styler, ensuring your shoes have that professional, polished look.
Step 1: Understand the Basics of Shading
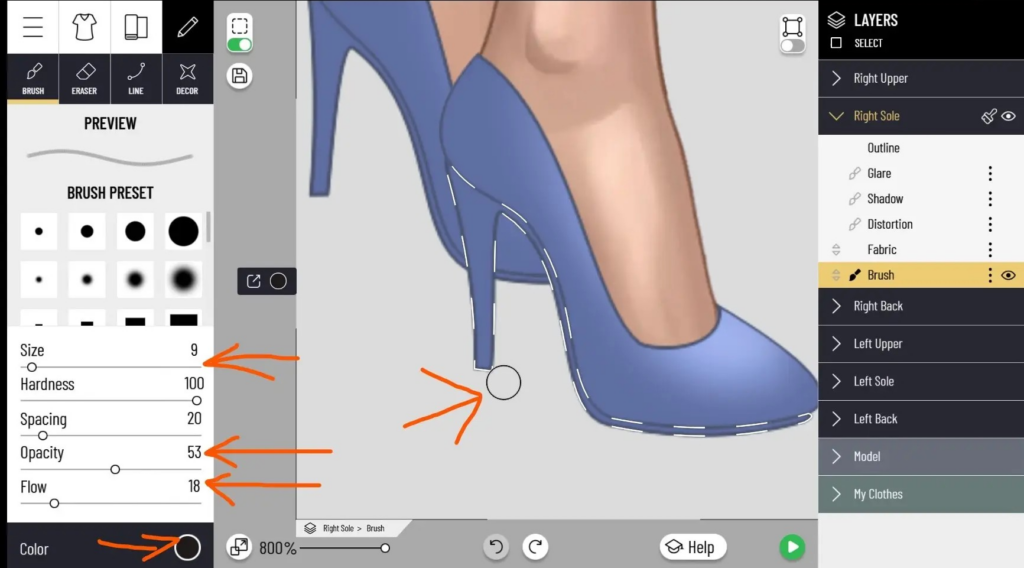
When shading a heel (or any part of a shoe), you’ll want to create a smooth, subtle transition using the paintbrush tool. The shading effect should be a soft, transparent dark color, which you apply along the edges of the shoe, particularly on the bottom heel.

Step 2: Adjust Your Paintbrush Settings
The most crucial part of shading is getting the brush settings right. You’ll need to adjust these depending on your shoe’s color, texture, and pattern.
Key Tip: The most important setting to tweak is the Flow. Keeping the flow low ensures that the color layers gently and gradually, which is essential for a smooth shadow effect.
Step 3: Applying the Shadow
Once your brush is ready, it’s time to apply the shadow. Here’s a quick technique for a clean, straight shadow:
Start by placing a small dot of paint slightly below where you want the shadow.
Then, hold the Shift key, and click at the point where you want the top of the shadow to be. This will draw a straight line of shading, which is great for the base of the heel.
Step 4: See the Final Results
After you’ve applied the shadow, zoom out to 100% view. This gives you the best perspective on how the shoe will appear in-game. You’ll see the dramatic difference between a shoe with proper shading and one without.

Pro Tip: Add Shadows Before Textures
It’s easier to manage shading before applying the shoe’s fabric color and patterns. However, if your brush gets “lost” under the fabric, you can quickly fix this by adjusting the layers:
- Open the Layers panel (on the right side of the screen).
- Move the shadow layer above the fabric and pattern layers.
- Then, fine-tune the shadow color to match the fabric better. For example, a dark red shadow works better for red shoes than black, and a dark brown might suit golden-yellow shoes better.
Hope these tips help take your shoe designs to the next level! Shading can make all the difference in giving your creations that extra touch of realism. Stay tuned for Part 2, where we’ll cover more advanced shading techniques!


